Showing posts with label bunker. Show all posts

Sunday, February 24, 2013

Welcome to Mr Boot's Axis Blog!


 Hello and welcome to my blog!  "Mr Boot's Axis Blog" features articles on culture, militaria, politics, and other interesting tidbits from the 1930s and 1940s, with a focus on the Axis point of view, and more often than not, the German point of view specifically.  I appreciate positive feedback, but discourage political messages.  This blog is to entertain and educate, not to promote or slander anyone's ideologies.  I hope you find something here that you like, and thank you for dropping by!

Monday, October 15, 2012

Fjell Festning: A Brief Overview 3

 Above:  Turret "Felix" installed in Fjell Fortress.  Photo taken after the war.

 Above:  The same location today.  A cafe now stands where "Felix" once did.

The primary function of Fjell Festning during the second world war, was to close off Allied sea passage to the port of Bergen and nearby areas.  To this end a massive gun battery was installed, with 4 kilometers of surrounding fortifications and facilities to accommodate it.  Additional medium caliber naval artillery pieces were taken from ships and placed in open firing positions to the southeast.  High-tech (for the time) radar sites kept the fortress personnel aware of who was in the sky above, and a healthy variety of Flak, including heavy 105 mm guns, protected the fortress from the air.  While as it sits now Fjell Festning is the third largest fortress the Third Reich built,  if construction were allowed to continue on its scheduled course it would not have been completed until the mid 1950s.

  Above:  Battle cruiser Gneisenau.

  Above:  Some naval mines on display in a railway tunnel underneath the mountain.  From left to right are mines of American, British, and German manufacture.

The battle cruiser Gneisenau was launched December 8th, 1936.  After a successful career against the British navy (including the sinking of aircraft carrier HMS Glorious) she was almost totally destroyed by a British heavy air raid during the night of 26-27 February 1942.  After deliberation, the decision was ultimately made to disarm her and use those weapons as components in the Atlantic Wall.  The triple 283 mm guns that comprised turret "Felix", were taken from Gneisenau and placed on a concrete gun shaft, extending deep into Fjedla mountain.

 Above:  The original electrical firing system for turret "Felix" , taken directly from Gneisenau, and installed in the magazine displayed later below.

 Above:  Some rails and a leftover cart for ammunition and supply movement.

 When fired the 283 mm guns slide back into the turret as a recoil mechanism. When fired from a naval platform, such as Gneisenau, the recoil produced from the guns not only rocked the 38,100 long ton capital ship some number of degrees in the opposite direction being fired,  but the entire ship itself was displaced, or pushed about 10 meters in that same direction.  When the main battery was installed in its fixed position and fired for the first time, an earthquake rocked Fjedla mountain.  Windows were blown out.  Concrete was shaken from the ceiling, and the gun mount for "Felix" was damaged.  While strictly hearsay, an interesting story still sometimes circulates about the underground hospital caving in when this happened, killing a number of men.  The Germans had only so much experience in installing super heavy guns in fixed positions (unlike say the French), and did not foresee the problem of recoil.  After repairing the damage done, their solution was to decrease the number of powder charges used to expel the shell from the gun barrel.  While this did reduce the maximum range of the guns, they still retained more than satisfactory coverage of the region.  When the fortress proper was abandoned in 1968, "Felix" was sold for scrap for the total of 3000 crowns.

  Above:  An ammunition preparation/magazine room.  The yellow warheads are high explosive.  Just to the left of the shot is the electrical firing system displayed above.

  Above:  The same room above.  These are powder charges and shell casings.  Imagine  how long the cannon shell, warhead, and charges would be just before firing!

Turret "Felix" was issued a number of different ammunition types.  A naval armor piercing round which could tear a ship in two,  a similar anti-ship round, but equipped with a timed fuze so as to explode in the enemy ships bowels, and high explosive rounds with impact fuses.  These were for defeating any land born threat.  When preparing to fire, the main guns had to be lowered to 2 degrees in order for the shells to be loaded.  These shells were so heavy and dense, that each barrel of the turret had a lifespan of about 300 uses.  After this they would have to be replaced, an expensive and time consuming task.  About 6 powder charges were used to propel the shell after the incident with the first test firing.  I have heard references to "Felix" being used in an anti-aircraft capacity, perhaps in a similar way as the Japanese Yamato used "Sanshiki" rounds from its main guns, but I have not been able to confirm this.

  Above:  The original main entrance to the tunnel system and main gun.  You can see an embrasure set into the wall on the left for a defensive weapon.  Notice the cafe roof showing above the hill.  Just to the left of that roof is a pile of leftover armor slabs.

 Above:  A schematic for the mechanical loading system that once extended up through the gun shaft.
 
  Above:  Inside the gun shaft.  The door to the upper right leads to the magazine displayed above.  The door at bottom leads to the tunnel system.  Notice the small passage on the upper left.  This is designed for shells to pass through, and was part of the original loading system

The original main entrance is no longer used.  Instead visitors descend a flight of stairs from the cafe sitting on the old turret mount, and enter the tunnel system through the gun shaft.  The shaft itself is three or four stories deep.  At the second level from the bottom, an ammunition magazine connects to the shaft.  While ammunition was stored here, this was more of a preparation room for immediate use.  The electrical firing computer of "Felix" was located in this room as well.  The larger bulk magazine is located deeper in the mountain.  The munitions elevator is no longer here, but would have run up and down the length of the main gun shaft. 

  Above:  Tunnels under the mountain.

  Above:  More tunnels under the mountain.

  Above:  A very long tunnel!

 Above:  More tunnels.  Notice the light reflecting off the heavy moisture.

  Above:  Tunnels connecting to barracks.  Notice the gun rack on the left.  Men stationed underground would stack their arms here when not in use (K98 rifles).  The rifles could be quickly grabbed while on the way out of their rooms.

The tunnel system underground is quite extensive.  Most of this consists of long passageways with connecting intersections and rooms.  These tunnels also connect to Regelbau bunkers closer to the surface, including those type 633 bunkers with M-19 automatic mortars, and the armored cloche discussed in the my last post.  Some of the network is not in very good shape, and thus off limits to visitors, notably the subterranean infirmary and command bunker.  At its average, the network lies some 3000 meters below the solid rock of Fjedla Mountain.  This facility was very capable of withstanding heavy bombardment by British capital ships, but was not very water tight due to the geology of the mountain and there is much water seepage throughout the tunnels, even a few stalactites.  A drainage ditch covered by wooden planks runs down most of the longer passageways.

  Above:  The personal quarters of the fortress commander.  Notice the "fancy" lights hanging from the ceiling.  This room had its own sink.

   Above:  A sauna room for the men underground.

 Above:  A latrine.  There were never privacy walls.

 Above:  These industrial cookers fed hundreds of men.

 When Fortress Fjell was built, it had some rare luxuries for the region.  While made of cold and bare stone or concrete, it had running hot water.  Not even the nearby town of Bergen had such a thing at that time.  Also there was the addition of a sauna.  This was included for reasons of health though, and less so for recreation.  The sauna was seen as a way to help stave off sickness from the cold, damp, and foreign atmosphere.  The fortress commander had his own running water in his room, in the form of a sink (only cold water).  He also brought a couple of stylized ceiling light covers from a city in Germany to be installed.

  Above:  Machinery for providing power to the base.

 Above:  Machinery involved in operating the main gun battery.

 Above:  The most photographed image in the whole tunnel network.  This door leads to electrical equipment.

The facility was first run by the Heer (Army), then transferred responsibility to the Luftwaffe (Air Force), and finally ended service with the Kreigsmarine (Navy).  While in in the service of the Kreigsmarine it is interesting to note, that instead of the four cardinal directions.  The navy personnel referred to directions as on a ship, with the bow being north, the stern being south, the port being west, and of course starboard referring to east. The tunnel networks and gun crew personnel amounted to well over a hundred men, not including the men stationed in the surrounding four kilometers.  For security and espionage reasons, those in the tunnel networks were rarely allowed to go outside.  This coupled with the weather of Norway, (which many of those Germans found to be gloomy) supposedly amounted to a somewhat high suicide rate among the men stationed underground.

  Above:  A searchlight and its trailer, temporarily stored in the tunnel network.

 The fortress was never assaulted by the Allies.  Immediately after the war the Norwegian military took over the site, and it was kept in service until 1968.  NATO used a part of it as a radar post until about 7 years ago.  Since most of it was abandoned, the fortress sat open and exposed to the elements for decades.  It was not until 2009 that a cafe was opened on top of the exposed gun shaft, to protect the tunnels below, and allowing visitors to pay a fee for a tour.

  Above:  Standard issue German fortress telephone.  You turn the right crank before use.

  Above:  Part of the original alarm system.  This machine was rebuilt by the tour manager (who's hand and arm are visible).  Turning the crank sounds loud, rapid bells throughout the facility.  It still works, as I convinced him to demonstrate!

  Above:  A variety of weapons on display.  From left to right, descending down are a British Sten gun, an American "Thompson", an American "Grease Gun", something special (see below), a British Bren gun, a Soviet PPSh-41, and at the bottom a Soviet DP-27.

Above:  A variety of museum pieces including daggers, grenades and flare guns.

 Above:  Uniforms and weapons on display.  The long tubes in the center are actually range finding devices for artillery or Flak targeting.

Much of this facility has survived well over the years of neglect.  Some of the original machinery is being restored by museum personnel, and in a few places original paint and messages can be seen.  Gun racks still line the walls, and wires for telephones or alarm systems connect to the ceiling regularly.  A couple of barracks quarters have been transformed into viewing rooms for museum pieces, including MG-42 and MG-34 machine guns, anti-tank rockets and a variety of small arms, uniforms and nicknacks.  The main washroom even produces clean water still.   The place feels simply gigantic when you are there under the earth, and the architecture and engineering alone are worth experiencing!

* This interesting weapon fires .45 caliber pistol rounds, but from what appears to be a semiautomatic mechanism in a wooden stock.  It is certainly American made, but this is the first time I had been introduced to such a device.


Friday, September 21, 2012

Fjell Festning: A Brief Overview 2


Above:  A Regelbau bunker connecting to a trench system.
 
 Welcome to the second installment in this series on Fjell Festning.  This segment will cover many of the areas surrounding the site for the triple 283 mm turret "Felix", and tunnel entrances.  All of these outlying positions existed to keep the main gun safe and operational.  The picture above gives a good example of the terrain in the immediate environs around the turret position.


Fjell Festning has plenty of trenches and field fortifications.  The trench system which lies in the immediate vicinity of the main gun battery, spans the western and northern perimeter around the gun shaft and main tunnel entrance.  These trenches connect to other Regelbau bunkers in the area, and a number of mortar positions as well.  The positions covered in this section are indicated by the blue circles in the sketch above.

  Above: Trenches facing the western slope of the mountain.

This area presents a few hazards. It was very wet the day we toured these positions, and one had to be careful not to slip and fall into the trenches below.  Plant life has reclaimed many areas, making it difficult to cross.  A few sections of the trench wall have caved in, making it necessary to find a way out, or around.  There is also an abundance of rusty razor wire mixed in with the rocks, plants, and ground cover.  So it is wise to watch where you step.

 Above:  Communications trench, notice the exclusive use of natural materials.

Most of these positions feature natural rock from the surrounding landscape.  This creates  an often seamless veil, so that even when looking at one of these Fjell positions, one cannot be sure if it is an artificial feature or a natural one!  The trench walls are all lined with local stone, and so are the mortar positions.  Many of the regelbau bunkers here also incorporate rock in the spaces in between the concrete and ground/grass.  Using this local natural rock, not only of course creates a great camouflage effect, but also reduces the amount of materials that must be brought in from elsewhere.

 Above:  M-19 automatic mortar launcher in action.  Purpose built for forts like Fjell.

 Above:  The firing port for a type 633 regelbau and ventilation pipe.

This next position is circled in purple in the previous map. In the picture above,  notice the metallic "cap" or cover piece on the ground, and to the left.  This is the armored dome to a regelbau type 633, which housed an M-19 Maschinengranatwerfer (grenade thrower machine).  This machine was invented in 1934 to defend permanent military installations.  The M-19 fired a 5 cm mortar, up to 120 rounds per minute, out to 750 meters.  This higher rate of fire was rarely used though, as it caused much stress to the complicated mechanical system.  To operate the M-19 a two man crew was required; however, others were needed to prepare munitions while firing.  To the right a ventilation pipe can be seen.  

 Above:  Trench connecting to a standalone ringstand near the western slope of the mountain.

 Above:  Looking down into the same ringstand.

 Above:  Inside the same ringstand.

 Above:  Entrance to the same ringstand.


Ringstand are very common here.  Some sit on the roof of a larger bunker, and some are standalone concrete positions.  They all connect to the trench system and help to secure not only the perimeter of the main gun and tunnels, but also provide security inside the perimeter in case of enemy penetration. 

 Above:  Posts for razor wire fence can still be found in abundance.  I straightened these posts upright for the picture.

 Above:  Picture taken years ago, but an excellent shot illustrating the simple and effective road block further down the main mountain road.


Posts for razor wire are everywhere, and help to illustrate just how difficult it would be to approach this complex if you were unwelcome.  An impressive roadblock exists much further down the main road of the mountain.  Balanced on top of rock piles, are a number of massive boulders.  These run parallel to the (very) narrow road on both sides.  Attached to each rock used to be a small explosive charge.  When set off these boulders would be blown onto the road, making any crossing by vehicle quite impossible.

 Above:  An old German leitstand, now used for Norwegian weather tracking.


 Above:  To the right of the previous photo lies this huge armored cloche.

Radar equipment can be seen in the first of the two pictures above.  This leitstand (control bunker) was used after the war by NATO as a radar site until recently. The Norwegians still use this position for weather forecasting, and it is surrounded by a high fence.  Notice the Norwegian colors flying to the right.  The photo immediately following is the same bunker, but panned to the right.  The prominent white structure is an Sk für Sechsschartenturm 35P8.  This is a heavily armored cloche, or dome.  Six evenly spaced embrasures line the circumference of the cloche, allowing for two machine guns to simultaneously fire in opposing 180 degree arcs.  This formidable piece of engineering dominates the approaches to the main gun, tunnel system, leitstand, and surrounding area. This position also connects to the tunnel network under the mountain.  The leitstand and armored cloche are circled in red in the map above.

Above:  Trenches near the western slope connect to an overgrown mortar pit.  
 
Above:  Another mortar pit, this one is further to the east.
 
There are a few mortar pits attached to the trench system in this area.  In the photos above notice the platform of rock in the center of the pit.  This is where the mortar was placed and fired. While a bit overgrown with plant life, you can still see the crew positions on either side of the rock shelf, in the form of two deeper depressions.  All of these mortar pits are well camouflaged and made from local rock. 

Above:  A machine gun embrasure covering the entrance to a regelbau.

 
 Above:  The entrance to a standalone ringstand on the northeastern end of the perimeter.

 
Above:  A regelbau type 672 (gun shelter), along the road which leads to the previously illustrated leitstand.  In the map above it is circled in blue, and the farthest bunker to the right.

Next time in this series, I will discuss the subterranean complex and main gun shaft for heavy turret "Felix".  There will be plenty more color photographs (and many of them underground), of the largest fortress built in Norway by the Germans, Fjell Festning!

Wednesday, September 12, 2012

Fjell Festning: A Brief Overview 1

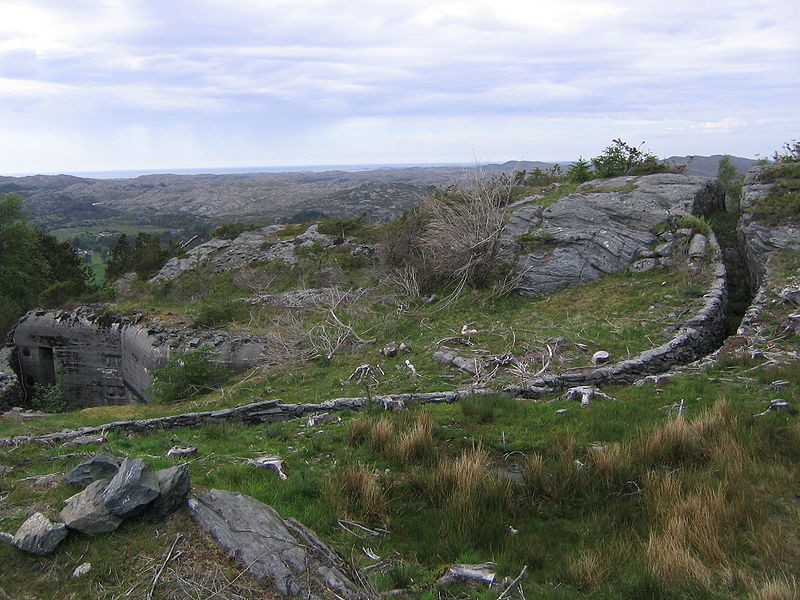
Above:  A trench connecting to regelbau and field positions.  Picture taken five years ago, but a great shot revealing the hidden nature of the facility.

Fjell Fortress (or Fjell Festning if you are Norwegian) exists on the fringes of the busy town Bergen in southwestern Norway.  This fort is actually a massive gun turret, and series of tunnels and rooms built beneath a mountain.  With a great number of surrounding bunkers and smaller gun positions to protect the perimeter, main gun, and tunnel entrances.  This was the largest fortress built in Norway by the Germans, and the third largest fortress built by the Third Reich in general.  Fjell Festning was still in use by NATO until 2003.

 Above:  A map showing the location of Fjell Fortress in relation to Bergen and associated communities Straume, and Fjell.

The day we arrived it was a bit cold,  foggy, and consistently showering us with a light drizzle of rain. The terrain is hilly and often steep.  The surrounding countryside is very lush, with many ferns and pine trees.  Some of the bunkers are currently overgrown with ferns and fauna of various sorts, and locked steel doors prevent access into many of the bunkers and smaller tunnels.  All, or nearly all of these positions are masterfully camouflaged.  Often it is only from one direction that these regelbau bunkers can be looked at and recognized for what they are.  When standing on top of these bunkers, an attached ringstand or ventilation pipe is often the only clue as the to nature of the inconspicuous "mound".  Additionally, since many of these bunkers are built into the side of a hill, there is no "mound" worth mentioning, only an extension of the natural slope of the hill itself.  From the air the 283 mm triple gun turret could easily be seen, but the rest of the compound must have been almost invisible.


The entire fortress as a whole actually covers much more ground than what the display above shows.  An abundance of other bunkers, Flak positions, artillery positions, road blocks, military buildings, and trenches exist in the surrounding areas, all built to compliment the subterranean complex and naval gun at the top of the mountain.  Standing in the area that the above map displays, gives one little to no clue, that there are in fact many long tunnels and big rooms deep beneath your feet. This primitive map simply illustrates the positions in the immediate vicinity of the triple 283 mm turret, which was certainly the centerpiece of the fort.

Above:  Ringstand on top of the same 629.

Above:  Type 629 regelbau with trench.      

The bunker in the two pictures above is the southern most of those located next to the main gun turret, and acted as part of a perimeter defense network.  Its location can be identified by the blue circle indicated in the map above.  This Regelbau bunker was a type 629 sonderausfuhrung (special version).  Type 629s were PAK (anti-tank) shelters.  This one probably held a smaller caliber weapon such as the 3.7 cm PAK 36.  This gun would be kept in the shelter when not in use, or when under artillery attack.  It would then be wheeled out of the bunker into a firing position when the time came to fight.  Notice the dark subterranean entrance.  This is actually an entrance/exit to a system of communication trenches.  A short flight of steps can be seen on the right, disappearing into the bunker wall.  This leads to a ringstand which sits camouflaged atop the bunker, and offers a 360 degree field of fire.  It does not connect to the rest of the bunker internally.   

Above:  3.7 cm Panzer Abwehr Kanone (anti-tank cannon).  The 629 gun shelter in question probably contained one of these.

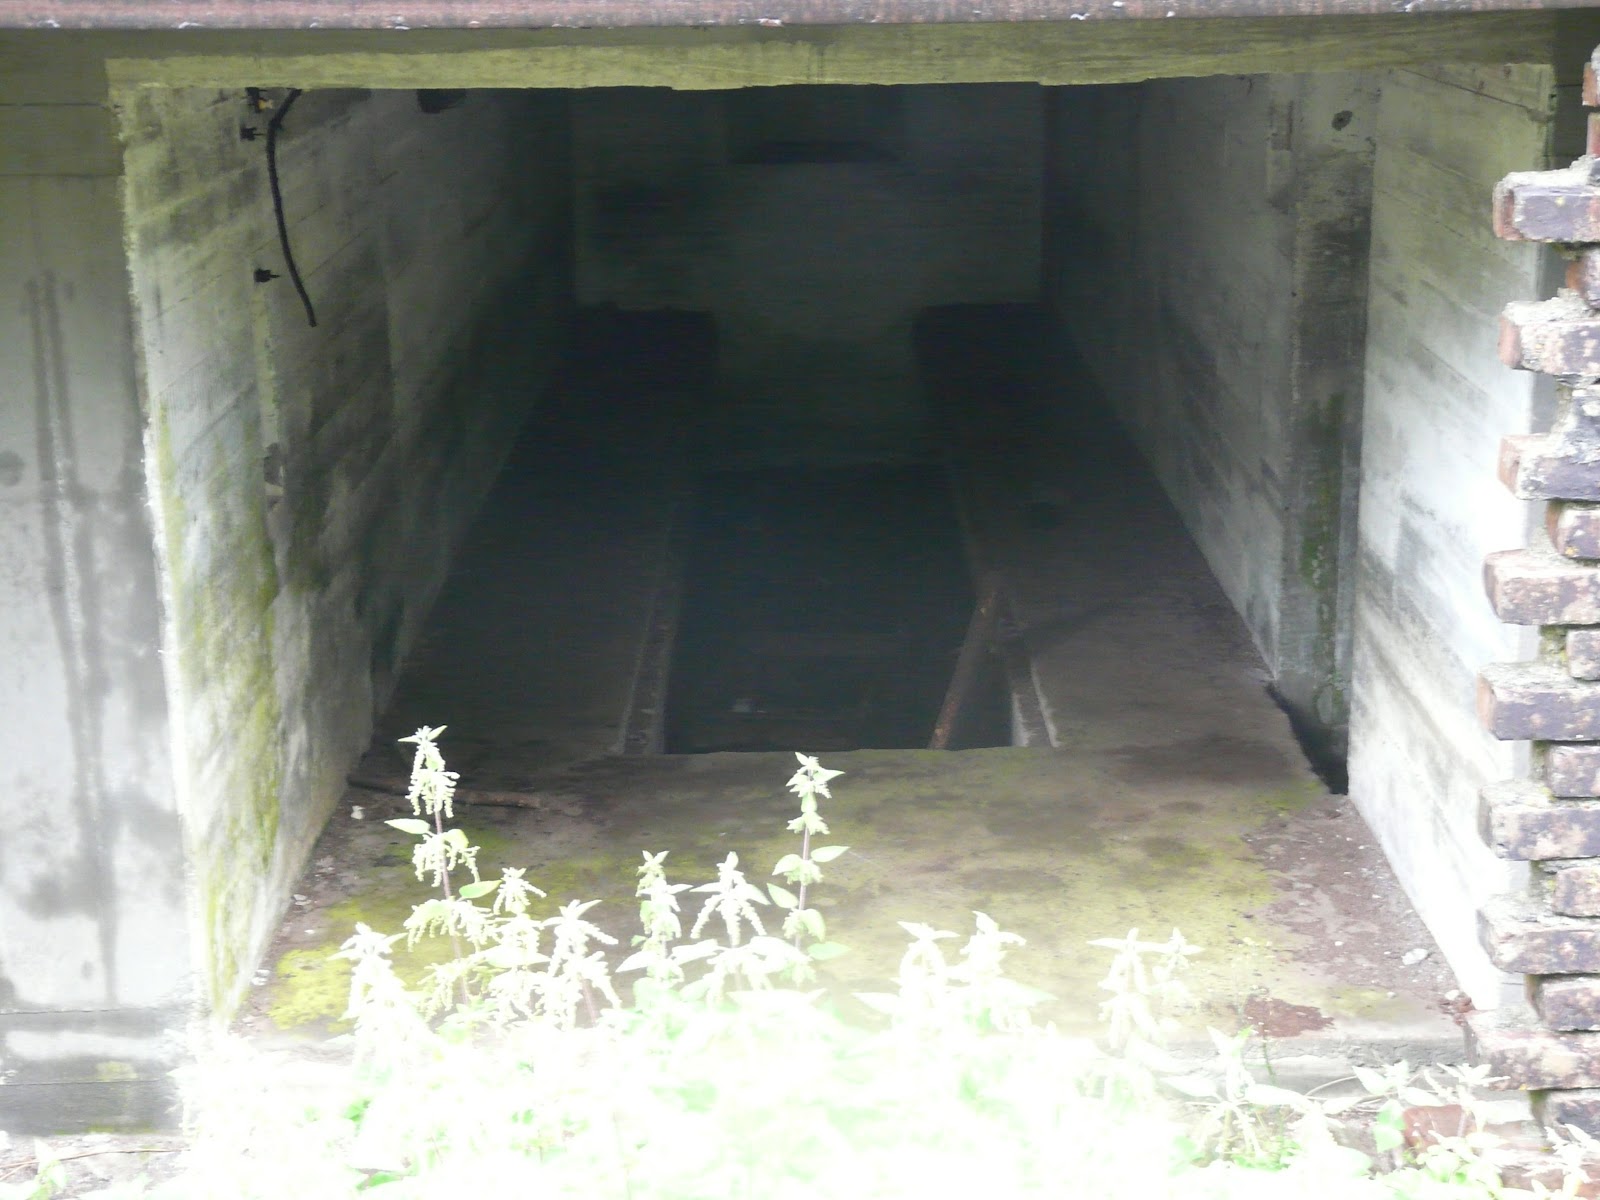
 Above:  The garage for a smaller caliber PAK in the same regelbau 629.

Just out of sight, and immediately to the right in the picture displaying the trench and ringstand entrance, is the gun garage.  Notice the hollow floor center.  This space would be used to store munitions for the gun assigned to this shelter, and would be covered by easily removable wooden planks most of the time.  I could not find a proper door here, or the remains of one for that matter.  As the site was never completely finished, it is possible that an armored door was never installed.  Note the brickwork in the right of the picture.  This leads me to believe that after the war the Norwegians may have bricked the garage up to keep people out of the bunker.  A number of other similar bunkers had this brickwork present as well.

Above:  The trench entrance/exit is more of a tunnel...

 Above:  ..and then opens up to sky and light.
 
The entrance to the trench system here runs underground for a short distance before reaching the surface and open sky.  This then twists and turns for a long distance, connecting with many other bunkers and field fortifications.  From the top these are very hard to see.  The trench system will be covered more in later posts.

Above:  The same 629 shelter, looking back from the trench entrance.  Notice the garage on the left.

More to come soon!  Fjell Festning:  A Brief Overview 2